Command Line Arguments
DR Sim Manager can be launched with command-line arguments to control its behavior at startup. This is especially useful for automation, scheduled tasks, and integration with tools like Stream Deck or Touch Portal.
Location of the Executable
Section titled “Location of the Executable”By default, DR Sim Manager is installed to:
C:\Program Files\DR Sim Manager\DRSimManager.exeIf you chose a custom install location during setup, navigate to that folder instead.
Complete Argument Reference
Section titled “Complete Argument Reference”| Argument | Description |
|---|---|
-minimized |
Starts DR Sim Manager in a minimized state (to taskbar or system tray, depending on settings). |
-autostart |
Automatically starts motion on launch. Requires both -g and -p to be specified. |
-g <game name> |
Selects the specified game on launch. Use the game’s folder name (see below). |
-p <profile name> |
Selects the specified profile on launch. Use quotes if the name contains spaces. |
Argument Details
Section titled “Argument Details”-minimized
Starts the application minimized. If Minimize to System Tray is enabled in Settings, the application minimizes to the system tray. Otherwise, it minimizes to the taskbar. This is equivalent to the Launch Minimized setting but applied per-launch.
-autostart
Automatically begins motion output as soon as the application finishes loading. Both -g (game) and -p (profile) must also be specified so the application knows which game and profile to use. Without them, autostart has no effect.
-g <game name>
Selects a game source on startup. The game name must match the folder name used internally. To find the correct name:
- Right-click in DR Sim Manager.
- Select Browse Profiles.
- The folder names shown correspond to game names (e.g.,
DCSWorld,AssettoCorsaCompetizione,iRacing).
-p <profile name>
Selects a motion profile on startup. The profile name must match exactly (case-sensitive). Use quotes around names that contain spaces.
Usage Examples
Section titled “Usage Examples”Start minimized with a specific game and profile, auto-starting motion:
Section titled “Start minimized with a specific game and profile, auto-starting motion:”"C:\Program Files\DR Sim Manager\DRSimManager.exe" -minimized -autostart -g DCSWorld -p "Apache profile"Start with a specific game and profile, without auto-starting:
Section titled “Start with a specific game and profile, without auto-starting:”"C:\Program Files\DR Sim Manager\DRSimManager.exe" -g iRacing -p "Default"Start minimized only (no game/profile selection):
Section titled “Start minimized only (no game/profile selection):”"C:\Program Files\DR Sim Manager\DRSimManager.exe" -minimizedSetting Up Auto-Start with Windows
Section titled “Setting Up Auto-Start with Windows”To have DR Sim Manager launch automatically when Windows starts:
- Press Win + R, type
shell:startup, and press Enter. - Right-click in the Startup folder and select New > Shortcut.
- For the location, enter the full path to the executable with your desired arguments:
"C:\Program Files\DR Sim Manager\DRSimManager.exe" -minimized -autostart -g DCSWorld -p "Default"
- Name the shortcut (e.g., “DR Sim Manager Auto”) and click Finish.
DR Sim Manager will now launch with your specified arguments every time you log in.
Windows Shortcut Configuration
Section titled “Windows Shortcut Configuration”You can create a desktop or Start Menu shortcut with arguments pre-configured:
- Right-click on the desktop and select New > Shortcut.
- Enter the executable path:
"C:\Program Files\DR Sim Manager\DRSimManager.exe" - Click Next, name the shortcut, and click Finish.
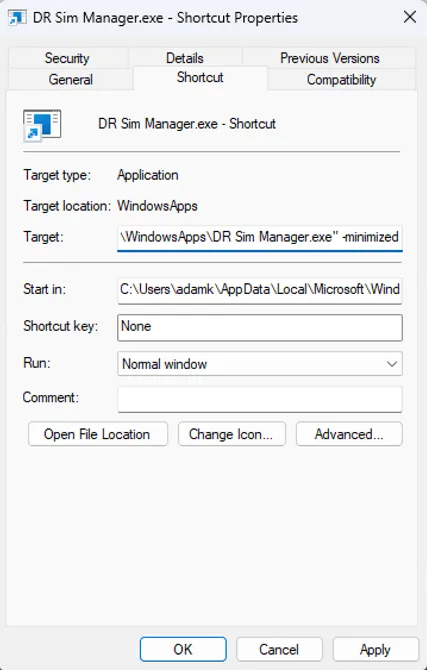
- Right-click the shortcut and select Properties.
- In the Target field, append your arguments after the executable path:
"C:\Program Files\DR Sim Manager\DRSimManager.exe" -minimized -autostart -g BeamNG -p "Default"
- Click OK.
Stream Deck Integration
Section titled “Stream Deck Integration”Basic Setup
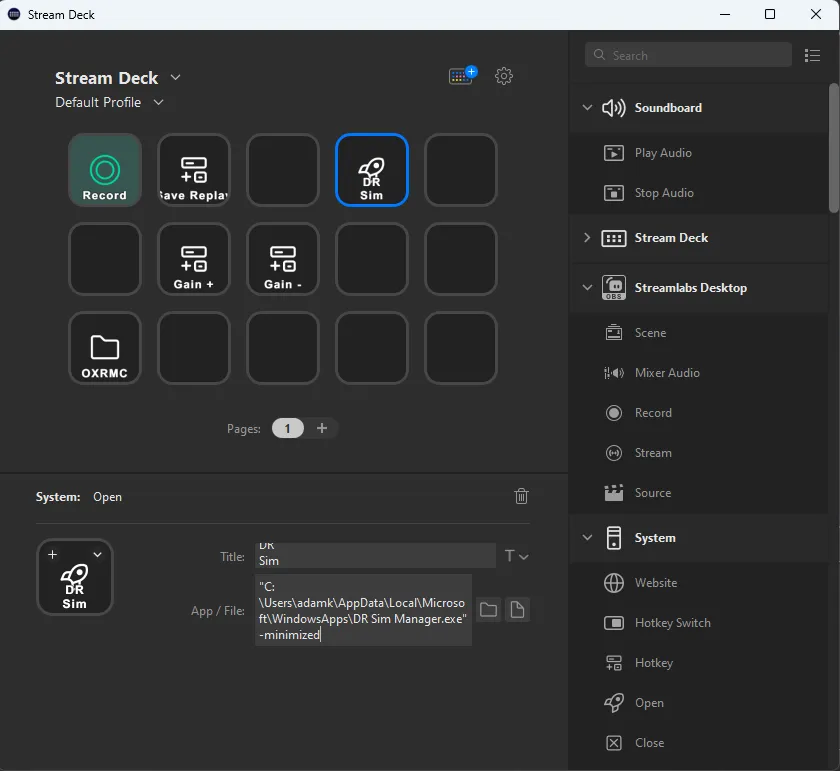
Section titled “Basic Setup”- Add a System > Open action to a Stream Deck button.
- In the App / File field, enter the full path:
C:\Program Files\DR Sim Manager\DRSimManager.exe
- Leave the path unquoted in the App / File field — Stream Deck handles quoting automatically.
Advanced Setup with Remote Control
Section titled “Advanced Setup with Remote Control”For more flexible control (start, stop, pause, adjust gain), use the Remote Control Interface with Stream Deck’s Multi-Action or System > Open actions to run PowerShell commands:
powershell "%userprofile%\AppData\Local\DRSimManager\RemoteControl\DRSM-WebSocket-Client.ps1" -Command "start"See Remote Control for the full list of available commands.
Stopping Motion Using a Macro
Section titled “Stopping Motion Using a Macro”To stop motion and close the application with a single button:
- Create a Multi Action on Stream Deck.
- Add a System > Open action that runs the stop shortcut (or use the PowerShell client to send a stop command).
- Add a short delay (2–3 seconds).
- Add another action to kill the process.
Touch Portal Integration
Section titled “Touch Portal Integration”Touch Portal can execute command-line applications directly:
- Create a new button in Touch Portal.
- Add an Action > Run Application action.
- Set the application path to:
C:\Program Files\DR Sim Manager\DRSimManager.exe
- Set parameters to your desired arguments:
-minimized -autostart -g iRacing -p "Default"
For advanced control, use the PowerShell WebSocket client via a Run Shell Command action:
powershell "%userprofile%\AppData\Local\DRSimManager\RemoteControl\DRSM-WebSocket-Client.ps1" -Command "start"Combining with Other Features
Section titled “Combining with Other Features”- Kiosk Mode + Auto-Start: Use
-minimized -autostartwith the Launch in Kiosk Mode setting to create a fully automated, locked-down setup for commercial venues. - Remote Control: Use command-line arguments for initial setup, then switch to the Remote Control interface for ongoing control from a phone or tablet.
- Multiple Shortcuts: Create different shortcuts for different games/profiles and pin them to your taskbar for quick access.